Mini plus sign quilt top tutorial, for all your favourite little girls and their baby dolls! This one is for my Ivy Lynn!
Ivy will be turning 2 soon!!!! I know!!!! Just stop it!!! Stop growing up!!! She is a girl with a strong personality at home, and does not like to share her mamma with anyone out of the house (actually in the house too). She is also the biggest lover of babies that there is. She dreams and talks about babies 24 hours a day. She looses her mind (gets super excited) when she sees a baby in real life, and she wants to watch shows about babies, read books about babies, baby her babies, so on and so on… babies babies babies. I have also noticed that she will just say the word baby over and over and over until something baby related happens. Did I just say the word baby too much??? That’s my life with Ivy!
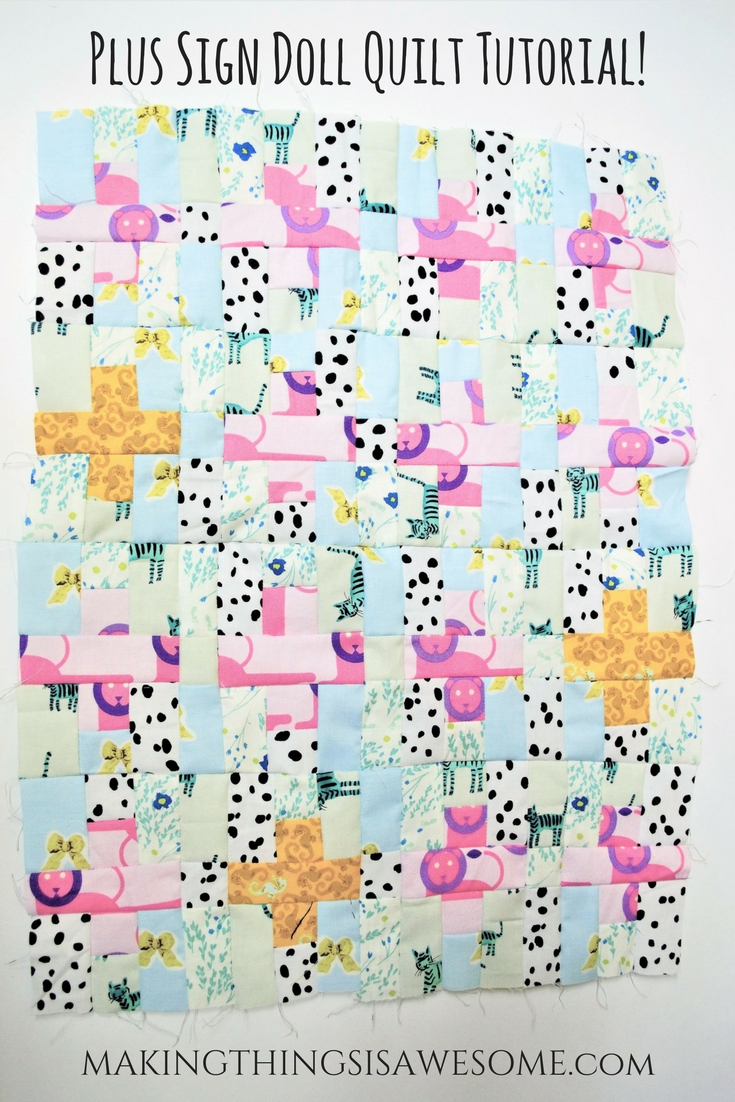
So… it’s her birthday coming up, so I decided to make her baby doll a special quilt. She loves to wrap her babies up in blankets and hold them and put them to sleep by saying shhhhhh, shhhhhh, shhhhh. It’s very cute. So I’m attempting to make her baby doll quilt dreams come true with this Mini Plus Sign Quilt. Hopefully she will put her babies to bed with it too!

I was looking around Pinterest for a little mini plus sign quilt pattern and I found the cutest Mini Plus Friends Quilt Tutorial on the awesome quilting blog Kviltstina! I love how little the pieces of this quilt are, so that I can fit more plus signs on a baby doll quilt. I made some small changes to her pattern and I’ll show you my little version of her beautiful quilt. If you would like to make the bigger version jump on over to Kviltstina’s tutorial. It’s super easy to follow along and the pattern is super cute! However, if you are here for a cute baby doll quilt idea, please follow along with these easy to follow step by step photos.
Mini Plus Sign Quilt Top For a Baby Doll Tutorial
Materials Needed:
- Bright coloured fabrics – I used 2 (you could use as many as you like) bright coloured quilting weight fabric to make the plus signs with (I used a pink lion print fabric and a yellowy/orange seahorse fabric for my plus signs)
- Contrasting coloured fabrics – I used 4 different contrasting coloured fabrics for the background of the plus signs (I tried to stick to black, white, and blue fabrics)
- Sewing machine
- Thread
- Ruler
- Rotary cutter
- Rotary cutter mat
- This Pattern!!!
Method to Make a Mini Plus Sign Quilt Top for a Baby Doll: (4 Mini Plus Signs by 4 Mini Plus Signs)
Step 1: Cut out your pieces of fabric!
Fabric needed:
- For the plus signs part of the blocks: 32 (1 1/2 by 1 1/2 inch squares) and 16 (1 1/2 by 3 1/2 inch rectangles)
- For the contrasting background area of the plus sign blocks: 32 (1 1/2 by 1 1/2 inch squares) and 64 (1 1/2 by 2 1/2 inch rectangles)
- For the dividers between blocks: 12 (1 1/2 by 1 1/2 inch squares) and 24 (1 1/2 by 2 1/2 inch rectangles)
- For the edging on the sides of the plus sign blocks: 8 (1 1/2 by 1 1/2 inch squares) and 16 (1 1/2 by 2 1/2 inch rectangles)
SO IN TOTAL!!! Fabric pieces to be cut are:
84 (1 1/2 by 1 1/2 inch squares) – 32 bright coloured & 52 contrasting coloured
16 (1 1/2 by 3 1/2 inch rectangles) – 16 bright coloured
104 (1 1/2 by 2 1/2 inch rectangles) – 104 contrasting coloured
LOL I hope that is VERY clear (and not at all confusing) for you!!!
I cut mine all up and threw it in a basket. As I was sewing I would just grab one out and sew it into the quilt!

Step 2: Start sewing your mini plus sign blocks together. Lay your fabric pieces out like this…

Sew your middle 1 1/2 inch squares together. Like this…

Sew the side 1 1/2 by 2 1/2 squares to sandwich your 2 squares. Like this…

Sew these blocks to the center of the plus sign. Like this…

You made you first mini plus sign block! Now make 15 more! This is what mine look like.

The next steps are where I made adjustments to my quilt inspiration. to reduce the size and customize it for a doll quilt!
Step 3: Make a mini plus sign block divider like this… I sewed two 1 1/2 by 2 1/2 inch rectangles to the ends of a 1 1/2 by 1 1/2 inch square. Like this…

And sewed it between 2 mini plus sign blocks. Like this…

Make 11 more and sew them between each mini plus sign block. Like this…


Step 4: Sew your strips of mini plus sign blocks together. Like this…

Then you will have something that looks like this!!

At this point, I realized that the quilt would look better with an edge on it instead of the mini plus signs being right at the edge. So I created Step 5.
Step 5: Make a strip of 1 1/2 by 1 1/2 inch squares and 1 1/2 by 2 1/2 inch rectangles like this. I made sure none of the fabric matched the one that it would be sewed to. Like this..

Step 6: Iron your quilt top flat.

TAAA DAA!!!!


BIG TIP: The biggest thing about this quilt to make your corners meet up nicely is to make sure you are sewing with exact 1/4 inch seams!!! I didn’t realize this until after I made a couple mini plus sign blocks, so some of my corners are a little off, but I’m not concerned about perfect perfection. It’s a doll quilt.
I love how it turned out! I have tossed around a few ideas on how I want to finish the edges and the backing of this doll quilt so stay tuned for that. Any ideas for super cute edging would be welcomed in the comments section below. Thanks!!
If you don’t feel like making your own baby doll quilt here are a couple links to some beautiful baby doll quilts that are available on Etsy. Check them out here!
- ORGANIC DOLL QUILT – made by BertieBlooms
- ORGANIC DOLL QUILT – also made by BertieBlooms
I hope you found this little tutorial helpful to make your own super cute mini plus sign quilt top for your own baby dolls! Until next time, enjoy putting your own spin on awesome quilt pattern tutorials, and enjoy creating beautiful things!
XO JCL
P.S. Check out my other baby sewing projects here!
P.P.S. I have linked some products below that are super useful to make a baby doll quilt, and will make your sewing dreams come true!
I love all of these products and the threads come in about 15 different colour combinations. You can check them all out by clicking on the photos below. I make a very small commission from promoting products, but I only promote products that I love. You will never be charged more than what the product costs and I’m always looking for deals because “I love me a good deal.” Hope you have as much success as I have had with these awesome products!