What party is complete without swinging a rod at an awesome looking candy filled Popsicle Pinata? I have such amazing fun pinata memories from my childhood, so I wanted to share the tradition with my own kiddos. Who doesn’t love to destroy something to get candy, and the dog-pile to get the most candy? Am I right? So much fun!
But, to tell you the truth… I actually have a hard time putting any energy into creating something that I know will soon be destroyed. Like decorating beautifully intricate cakes or cookies. I just can’t! And that’s how I have always felt about making our own pinatas… so I usually just buy them from the store.
But guess what?!?! They are not as labor intensive as they look!! Especially if you enlist a cool kid to help you out. You can whip one of these large Popsicle Pinatas thing up in less than a couple hours. You got this!

RELATED POST: FRAMED POPSICLE ART

HOW TO MAKE A PINATA
MATERIALS NEEDED:
- Large Box
- Tissue Paper
- Masking Tape
- Glue Stick
- Duct Tape in Beige Popsicle Stick Color (Optional for the Popsicle Stick)
- Scissors & Exacto knife
- Pencil, Pen, or Felt
- Thick String (to hang it from)

METHOD:
Step 1: Decide what shape of pinata you want to make. We decided on a Popsicle because Corbin has requested a “Popsicle Obsticle Course Party”! I know! Where does he come up with these ideas? Blank stare…
Step 2: Draw the outline of your pinata shape on to some cardboard.
NOTE: Make sure you have enough cardboard for the front, back, and a 6 inch wide strip of cardboard for the edges.

Step 3: Cut out all your cardboard pieces.
I tried to cut them out with scissors, but found that too difficult for my delicate hands… An exacto knife works much more efficiently, just make sure you don’t cut the table surface underneath your cardboard, or yourself, or your little kids hands that need to touch everything!!

Step 4: Make the Popsicle stick part of the Popsicle pinata!
Cut out a popsicle stick shape, and cut a slit in the bottom of the edging of the popsicle, and slide it in. I then just used duct tape to secure it in place. I also got some popsicle stick colored duct tape, and put it all over the stick just for funsies!

Step 5: Tape the hole thing together with strips of masking tape. remember not to go crazy with the tape. The point of a pinata is to be able to be broken open by little kid stick swinging power.
Oh… And don’t forget to keep a spot open to be able to fill it will goodies!
Oh, Oh… And don’t forget to add your thick string to the top, to be able to hang it up! wink!

Step 6: Cut an 8 inch wide strip of tissue paper off, fold it in half (so you have a 4 inch by however long your tissue paper is long). Then use scissors to to cut 1/4 inch wide strips, about 2 inches long. Like this…

Step 7: Then cut up the back with scissors, to make all of your pinata tissue paper strips. Like this…

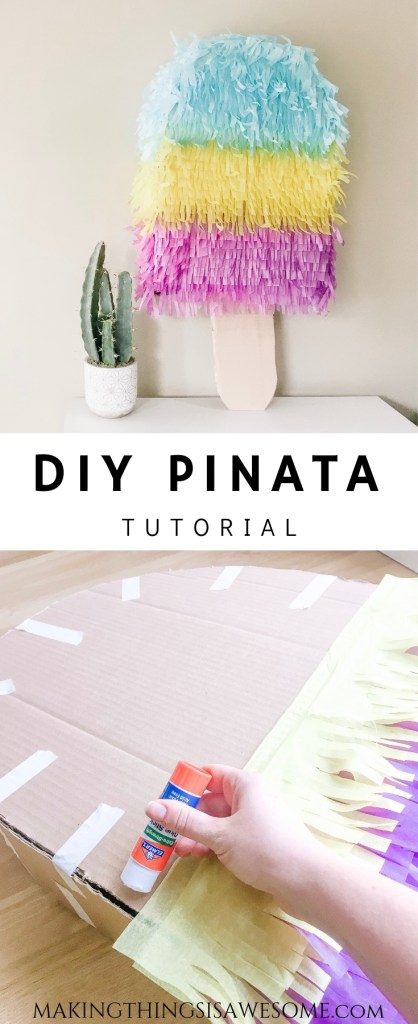
Step 8: Now for the FUN PART!! Use a glue stick to to add your strips of tissue paper to your popsicle pinata.
I started by doing the from and back and then filled in the edges. I didn’t bother with the bottom.


It goes super fast if you enlist an awesome kid to put a stripe of glue down right before you put the tissue paper on. Super fun activity for the kiddos, or at least my kids had to fight for over this super important job… guess who won?

Taaadaaa! Now you have yourself an awesome popsicle pinata that will soon be… destroyed…

RELATED POST: BALLOON ARCH TUTORIAL! – SET UP AND TAKE DOWN!

Now for stuffing this popsicle Pinata… What are your favorite things to put inside a pinata? Do you always put treats in? If not what are some awesome candy alternative ideas?
I heard of filling it with bouncy balls (when using the pinata in a Rented Hall or Large gym)… Imagine the kids going crazy running around after all the little bouncy balls. Lol…
Ours will be outside for Corbin’s Popsicle Obstacle Course Party. I think I’m going to be filling it with chocolate dollar coins, and salt water taffies… Some of Corbin’s faves!
Until next time, have fun creating memories for your little ones, and creating beautiful things everyday!
XO JCL


This is so stinking cute! Great job!
Lauren
Thanks so much Lauren
Eventhough now I am living in Denmark, I have not lost the tradition of celebrating my children´s birthday parties with a pinata. It is so much fun and colorful!
Awesome! Are there any kids party traditions that are done in Denmark that are uncommon elsewhere in the world?
AH this is such an awesome idea and super affordable. my daughter always asks for a piñata at parties , so this will be an awesome craft idea to make with her! great post
Yay! Creating with your kids is so much fun!
This is so cute. I love it. Thanks for sharing this with everyone. So fun.
Thanks Kelly! I’m so happy you love it!
Oh my gosh, this is so cute! And it seems much simpler to make than I first imagined. My daughter, who is 8, recently asked if she could have a pinata at her next birthday party – poor thing, her birthday is just days before Christmas! My own birthday is very close to Christmas as well, so I know all too well that birthday parties of any kind are rare at that time. lol My other two kids are teens and both their birthdays are in September…so, yeah, probably not. But if you knew my youngest, you’d know that something like Popsicles would be perfect for her – she loves spring colors and summer activities! She would go crazy over this Popsicle pinata. She’s also into crafting; she watches DIY on YouTube so much…so I just know she’ll want to do this project with me. Looks like I’ll be picking a day out of summer to throw some sort of party for her and her friends! Why not. Saving this! Thanks for the how-to. 🙂
Thanks so much Lisa! I know! Not as hard as I thought too. Pinatas for every occasion!! Lol! I love that your daughter is into crafting! My kinda girl! Sounds like you should throw her an awesome girl party! Have so much fun! You are an awesome mom! xo
I love this so much! It’s my son’s Naming Day/ 1st birthday bash at the end of May … this will be a great project for me and his 4&2 yr old siblings! You’ve made the steps really easy to follow – thank you xxx
Thanks so much Laura! I’m so happy to hear that you have some cool kiddos to help you out on this fun project. It really goes together quickly when you have little gluey hands to help. Have a beautiful Naming Day! Much Love! xo